Showing posts with label html tutorials. Show all posts

Friday, 27 January 2012

How to Add Slider Notification Widget in Blogger


SlideNote is a jQuery Plugin to Display Sliding Notifications in your blogger blogs and websites etc. Displaying sliding notification Notes as a Widget on your blog is a great way to showcase the stuff which you think your readers should notice. You might have noticed that many popular blogs are having that kind of sliding notifications area visible as you scroll the page towards the bottom of the page, and it goes invisible when you are at the top of the page.
Add Slider Notification in Blogger using SlideNote
SlideNote is a customizable, flexible jQuery plugin that makes it easy to display sliding notifications on your website or in your web application. SlideNote is compatible with jQuery 1.4.3 and current versions of major browsers. IE8 is the only version of Internet Explorer that is officially supported. I have tried to make it available for blogger users as a gadget, lets move ahead and see how we can add this wonderful widget in your blog. 


Steps to Add Slider Notification Widget in Blogger
Note: Before making any changes to your template, take a full backup of your blogger template.

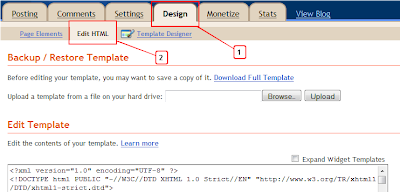
#Step 1. Log in to your Blogger Dashboard and Navigate to Design> Edit HTML.
Design Edit HTML


#Step 2. Include SlideNote in the header of your page. Make sure it is included after jQuery.

- Copy below code and paste it just before the </head> tag.
<script src="http://ajax.googleapis.com/ajax/libs/jquery/1.4.2/jquery.min.js" type="text/javascript"></script>
<script src="https://sites.google.com/site/bloggerhowto/blogger-how-to/jquery.slidenote.min.js" type="text/javascript"></script>

#Step 3. Copy below code and paste it just 
before the ]]></b:skin>.
/* ----- LinkToHow.Blogspot.com CSS START------ */
.slidenote { width: 540px; height: 140px; background: #FBEC78; padding: 1em;
-moz-box-shadow: -0.2em -0.2em 0.7em #333; -webkit-box-shadow: -0.2em -0.2em 0.7em #333;}
.slidenote img { float: left; margin-left: -2em; margin-top: -2em; }
.slidenote img:hover { margin-top: -1.95em; }
/* ----- LinkToHow.Blogspot.com CSS END------ */


#Step 4. Now Copy below code and paste it just before the </body> tag.
<!-- Notification Slider Start -->
<div class='slidenote' id='note'>
<div id='container'>
<h2>Blogger How to Tips</h2>
<span><em>Get All Blogger and Blogspot Related Tips !!! :) </em></span>
<p>Visit now : <a href='http://
prohackersden.blogspot.com/'>http:// prohackersden .blogspot.com/</a> and learn ... <br/><a href='http:// prohackersden .blogspot.com/'>LinkToHow</a> | <a
href='http://
prohackersden .blogspot.com/'> prohackersden </a></p>
</div>
</div>
<script type='text/javascript'>
$(&#39;#note&#39;).slideNote({
closeImage: &#39;https://blogger.googleusercontent.com/img/b/R29vZ2xl/AVvXsEgv3KhgXzFMLu1f8I-Be0ZU8BDWcDWTsZhThhJjK-6oyQg5tRL_ZqVyeMso9y7GO71l7SlBtYf5B3ql8oqkP2a-Wstvty9H6-7MOQ4Dcbi-hO0GE6BYCpGSeSMCIixu7pwLyCUvxafmLhoD/s1600/slidenote.close.png&#39;
});
</script>
<!-- Notification Slider Ends -->


#Step 5. Save Template and done!. You can change the value of CSS classes as per your need. Scroll down the page to the bottom of the page and you will see the notification.
Download the full plugin including the un-minified source code, demo page, README, and sample stylesheet :http://slidenote.info/download/jquery.slidenote.zip

SlideNote Options

SlideNote offers a set of five options that allow you to modify the behavior and/or content of the script.
  • where specifies how far down the user must scroll before the notification slides into view.
  • corner controls from which side of the screen the notification will slide in.
  • URL tells SlideNote from where to pull the data to use as the content of the notification. If no container is specified, then the entire page will be used.
  • container is to be used in conjunction with URL. When specified, it will only pull content from the element having the specified ID from the specified URL.
  • closeImage displays the image at the specified URL. When clicked, it will slide the note out of view. The note will not display until the next time the user scrolls passed the wherevalue.

How To Add JQuery Pop-Up For Facebook Like Box in Blogger


  •  Login to blogger and go to Design-->Edit HTML
  • Search for the tag </head> ( Using CTRL + F )
  • Copy n paste below code just above it


<script src='http://ajax.googleapis.com/ajax/libs/jquery/1.5/jquery.min.js'></script>
<script src="https://sites.google.com/site/topbloggerinworld/colorbox-min.js"></script>
<link rel="stylesheet" href="https://sites.google.com/site/topbloggerinworld/fbpopup.css" type="text/css" />
<script type="text/javascript">
    jQuery(document).ready(function(){
       if (document.cookie.indexOf('visited=flase') == -1) {
           var fifteenDays = 1000*60*60*24*30;
           var expires = new Date((new Date()).valueOf() + fifteenDays);
           document.cookie = "visited=true;expires=" + expires.toUTCString();
       $.colorbox({width:"600px", inline:true, href:"#mdfb"});
           }
    });
    </script>
Now save your template
Adding HTML Code

In your blogger --->Design--->Page elements--->Add a gadget
Choose HTML/Javascript From list
Copy n paste below HTML code into it

<div style='display:none'>
       <div id='mdfb' style='padding:10px; background:#fff;'>         
<center>
<table align="center" background="https://blogger.googleusercontent.com/img/b/R29vZ2xl/AVvXsEhv6Xmt4hW09xKo1pIphD1-vrBNhsH803oB2JBhJ95g7-_IRpyyJwyfqUW6VAs0_ElvYiOE1BqAOUj30zrR6LDlYwXI4A7q7U58tpLjmVXpff7EPp_j0DBQgZN1JLDMHdPmEH_iBmbQ-Fhd/s1600/adsense+background+image%2528linktohow.blogspot.com.jpg.png" border="0" height="300" style="width: 505px;"><tbody>
<tr><td height="345" width="505">
<div align="right">
<script src="http://static.ak.connect.facebook.com/js/api_lib/v0.4/FeatureLoader.js.php" type="text/javascript"></script> 
<script type="text/javascript">FB.init("32eb3732082b27e7c314feb421a56208");</script> 
<fb:fan profile_id="197027040378524" connections="10" width="360" height="270" css="https://sites.google.com/site/topbloggerinworld/mdfacebook.css"></fb:fan>
</div></td></tr></tbody></table></center>
<p style=" float:right;  margin-right:35px;  font-size:9px;" >Powered By <a style=" font-size:9px; color:#3B78CD; text-decoration:none;" href="http://www.Prohackersden.blogspot.com">Blogger Widgets</a></p>
</div></div>

Edit
Replace in above red colored number with your facebook page id
Now save the widget and you have done !!!

Drop Your Comments and Question below :) 

Sunday, 27 November 2011

Add A Email Subscription Form To Blogger


So many blogs and websites i visit these days haveimplemented a pop up subscription form for their newsletter.I'm sure you have seen it, you land on a site andafter a few seconds a form appears asking for your Email to subscribe.While these can annoy some people they have been proven to have a dramatic effect on the numbers of subscribers.In this post i will show you how to add a similar form to your Blogger blog but with a form to subscribe to your blog via Email Rss provided by feedburner.The form is a one time pop up so if someone visits your blog every day it will remember they visited before and not show the form again.


Add The Pop Up Subscription Box To Blogger


Remember Always Back Up Your Template Before You Make Changes

Step 1. In Your Blogger Dashboard Click Design > Edit Html 

Design Edit Html Blogger

Step 2. Find the following piece of code in your blogs Html : (Click Ctrl and F for a search bar to help find the code

]]></b:skin>

Step 3. Copy and Paste the following code Directly Above / Before ]]></b:skin>

Note - This is a scroll box make sure to get all the code.
/*Subscription Pop Up Css*/
#popupContactClose{
cursor: pointer;
text-decoration:none;
}
#backgroundPopup{
display:none;
position:fixed;
_position:absolute; /* hack for internet explorer 6*/
height:100%;
width:100%;
top:0;
left:0;
background:#000000;
border:1px solid #cecece;
z-index:1;
}
#popupContact{
display:none;
position:fixed;
_position:absolute; /* hack for internet explorer 6*/
height:384px;
width:408px;
background:#FFFFFF;
border:2px solid #cecece;
z-index:2;
padding:12px;
font-size:13px;
}
#popupContact h1{
text-align:left;
color:#6FA5FD;
font-size:22px;
font-weight:700;
border-bottom:1px dotted #D3D3D3;
padding-bottom:2px;
margin-bottom:20px;
}
#popupContactClose{
font-size:14px;
line-height:14px;
right:6px;
top:4px;
position:absolute;
color:#6fa5fd;
font-weight:700;
display:block;
}
/*End Subscription Pop Up Css @ http://www.spiceupyourblog.com */

Step 4. Find the following piece of code in your blogs Html : (Click Ctrl and F for a search bar to help find the code 

</head>

Step 5. Now Copy And Paste This Code Directly Above / Before </head>

<!--Pop Up Subscription-->
<script src='https://ajax.googleapis.com/ajax/libs/jquery/1.5.0/jquery.min.js' type='text/javascript'/> 
<script src='http://dinhquanghuy.110mb.com/jquery.cookie.js' type='text/javascript'/>
<script type='text/javascript'>
var popupStatus = 0;

//loading popup with jQuery magic!
function loadPopup(){
centerPopup();
//loads popup only if it is disabled
if(popupStatus==0){
$(&quot;#backgroundPopup&quot;).css({
&quot;opacity&quot;: &quot;0.7&quot;
});
$(&quot;#backgroundPopup&quot;).fadeIn(&quot;slow&quot;);
$(&quot;#popupContact&quot;).fadeIn(&quot;slow&quot;);
popupStatus = 1;
}
}

//disabling popup with jQuery magic!
function disablePopup(){
//disables popup only if it is enabled
if(popupStatus==1){
$(&quot;#backgroundPopup&quot;).fadeOut(&quot;slow&quot;);
$(&quot;#popupContact&quot;).fadeOut(&quot;slow&quot;);
popupStatus = 0;
}
}

//centering popup
function centerPopup(){
//request data for centering
var windowWidth = document.documentElement.clientWidth;
var windowHeight = document.documentElement.clientHeight;
var windowscrolltop = document.documentElement.scrollTop;
var windowscrollleft = document.documentElement.scrollLeft;
var popupHeight = $(&quot;#popupContact&quot;).height();
var popupWidth = $(&quot;#popupContact&quot;).width();
var toppos = windowHeight/2-popupHeight/2+windowscrolltop;
var leftpos = windowWidth/2-popupWidth/2+windowscrollleft;
//centering
$(&quot;#popupContact&quot;).css({
&quot;position&quot;: &quot;absolute&quot;,
&quot;top&quot;: toppos,
&quot;left&quot;: leftpos
});
//only need force for IE6

$(&quot;#backgroundPopup&quot;).css({
&quot;height&quot;: windowHeight
});

}


//CONTROLLING EVENTS IN jQuery
$(document).ready(function(){
if ($.cookie(&quot;anewsletter&quot;) != 1) {

//load popup
setTimeout(&quot;loadPopup()&quot;,5000);
}
//CLOSING POPUP
//Click the x event!
$(&quot;#popupContactClose&quot;).click(function(){
disablePopup();
$.cookie(&quot;anewsletter&quot;, &quot;1&quot;, { expires: 7 });
});
//Click out event!
$(&quot;#backgroundPopup&quot;).click(function(){
disablePopup();
$.cookie(&quot;anewsletter&quot;, &quot;1&quot;, { expires: 7 });
});
//Press Escape event!
$(document).keypress(function(e){
if(e.keyCode==27 &amp;&amp; popupStatus==1){
disablePopup();
$.cookie(&quot;anewsletter&quot;, &quot;1&quot;, { expires: 7 });
}
});

});
</script>
<!--End Pop Up Subscription @ http://www.prohackersden.blogspot.com -->

Step 6. Find the following piece of code in your blogs Html : (Click Ctrl and F for a search bar to help find the code

</body>

Step 7. Copy and Paste the following code Directly Above / Before </body>

<div id='popupContact'>
<a id='popupContactClose'>x</a>
<h1>Get Our Latest Posts Via Email - It&#39;s Free</h1>
<p id='contactArea'><form action='http://feedburner.google.com/fb/a/mailverify' method='post' onsubmit='window.open(&apos;http://feedburner.google.com/fb/a/mailverify?uri=prohackersden&apos;, &apos;popupwindow&apos;, &apos;scrollbars=yes,width=550,height=520&apos;);return true' style='border:1px solid #ccc;padding:3px;text-align:center;' target='popupwindow'><p>Enter your email address:</p><p><input name='email' style='width:140px' type='text'/></p><input name='uri' type='hidden' value='SpiceUpYourBlog'/><input name='loc' type='hidden' value='en_US'/><input type='submit' value='Subscribe'/><p>Delivered by <a href='http://feedburner.google.com' target='_blank'>FeedBurner</a></p></form></p>
</div>
<div id='backgroundPopup'/>

Important - You need to change our feedburner username with yours.The username for your feed can be found at the end of your feed URL.For example the our feedburner URL ishttp://feeds.feedburner.com/prohackersden/ , with SpiceUpYourBlog being the username.


Drop your comments  below. 

Add A Email Subscription Form To Blogger


So many blogs and websites i visit these days haveimplemented a pop up subscription form for their newsletter.I'm sure you have seen it, you land on a site andafter a few seconds a form appears asking for your Email to subscribe.While these can annoy some people they have been proven to have a dramatic effect on the numbers of subscribers.In this post i will show you how to add a similar form to your Blogger blog but with a form to subscribe to your blog via Email Rss provided by feedburner.The form is a one time pop up so if someone visits your blog every day it will remember they visited before and not show the form again.


Add The Pop Up Subscription Box To Blogger


Remember Always Back Up Your Template Before You Make Changes

Step 1. In Your Blogger Dashboard Click Design > Edit Html 

Design Edit Html Blogger

Step 2. Find the following piece of code in your blogs Html : (Click Ctrl and F for a search bar to help find the code

]]></b:skin>

Step 3. Copy and Paste the following code Directly Above / Before ]]></b:skin>

Note - This is a scroll box make sure to get all the code.
/*Subscription Pop Up Css*/
#popupContactClose{
cursor: pointer;
text-decoration:none;
}
#backgroundPopup{
display:none;
position:fixed;
_position:absolute; /* hack for internet explorer 6*/
height:100%;
width:100%;
top:0;
left:0;
background:#000000;
border:1px solid #cecece;
z-index:1;
}
#popupContact{
display:none;
position:fixed;
_position:absolute; /* hack for internet explorer 6*/
height:384px;
width:408px;
background:#FFFFFF;
border:2px solid #cecece;
z-index:2;
padding:12px;
font-size:13px;
}
#popupContact h1{
text-align:left;
color:#6FA5FD;
font-size:22px;
font-weight:700;
border-bottom:1px dotted #D3D3D3;
padding-bottom:2px;
margin-bottom:20px;
}
#popupContactClose{
font-size:14px;
line-height:14px;
right:6px;
top:4px;
position:absolute;
color:#6fa5fd;
font-weight:700;
display:block;
}
/*End Subscription Pop Up Css @ http://www.spiceupyourblog.com */

Step 4. Find the following piece of code in your blogs Html : (Click Ctrl and F for a search bar to help find the code 

</head>

Step 5. Now Copy And Paste This Code Directly Above / Before </head>

<!--Pop Up Subscription-->
<script src='https://ajax.googleapis.com/ajax/libs/jquery/1.5.0/jquery.min.js' type='text/javascript'/> 
<script src='http://dinhquanghuy.110mb.com/jquery.cookie.js' type='text/javascript'/>
<script type='text/javascript'>
var popupStatus = 0;

//loading popup with jQuery magic!
function loadPopup(){
centerPopup();
//loads popup only if it is disabled
if(popupStatus==0){
$(&quot;#backgroundPopup&quot;).css({
&quot;opacity&quot;: &quot;0.7&quot;
});
$(&quot;#backgroundPopup&quot;).fadeIn(&quot;slow&quot;);
$(&quot;#popupContact&quot;).fadeIn(&quot;slow&quot;);
popupStatus = 1;
}
}

//disabling popup with jQuery magic!
function disablePopup(){
//disables popup only if it is enabled
if(popupStatus==1){
$(&quot;#backgroundPopup&quot;).fadeOut(&quot;slow&quot;);
$(&quot;#popupContact&quot;).fadeOut(&quot;slow&quot;);
popupStatus = 0;
}
}

//centering popup
function centerPopup(){
//request data for centering
var windowWidth = document.documentElement.clientWidth;
var windowHeight = document.documentElement.clientHeight;
var windowscrolltop = document.documentElement.scrollTop;
var windowscrollleft = document.documentElement.scrollLeft;
var popupHeight = $(&quot;#popupContact&quot;).height();
var popupWidth = $(&quot;#popupContact&quot;).width();
var toppos = windowHeight/2-popupHeight/2+windowscrolltop;
var leftpos = windowWidth/2-popupWidth/2+windowscrollleft;
//centering
$(&quot;#popupContact&quot;).css({
&quot;position&quot;: &quot;absolute&quot;,
&quot;top&quot;: toppos,
&quot;left&quot;: leftpos
});
//only need force for IE6

$(&quot;#backgroundPopup&quot;).css({
&quot;height&quot;: windowHeight
});

}


//CONTROLLING EVENTS IN jQuery
$(document).ready(function(){
if ($.cookie(&quot;anewsletter&quot;) != 1) {

//load popup
setTimeout(&quot;loadPopup()&quot;,5000);
}
//CLOSING POPUP
//Click the x event!
$(&quot;#popupContactClose&quot;).click(function(){
disablePopup();
$.cookie(&quot;anewsletter&quot;, &quot;1&quot;, { expires: 7 });
});
//Click out event!
$(&quot;#backgroundPopup&quot;).click(function(){
disablePopup();
$.cookie(&quot;anewsletter&quot;, &quot;1&quot;, { expires: 7 });
});
//Press Escape event!
$(document).keypress(function(e){
if(e.keyCode==27 &amp;&amp; popupStatus==1){
disablePopup();
$.cookie(&quot;anewsletter&quot;, &quot;1&quot;, { expires: 7 });
}
});

});
</script>
<!--End Pop Up Subscription @ http://www.prohackersden.blogspot.com -->

Step 6. Find the following piece of code in your blogs Html : (Click Ctrl and F for a search bar to help find the code

</body>

Step 7. Copy and Paste the following code Directly Above / Before </body>

<div id='popupContact'>
<a id='popupContactClose'>x</a>
<h1>Get Our Latest Posts Via Email - It&#39;s Free</h1>
<p id='contactArea'><form action='http://feedburner.google.com/fb/a/mailverify' method='post' onsubmit='window.open(&apos;http://feedburner.google.com/fb/a/mailverify?uri=prohackersden&apos;, &apos;popupwindow&apos;, &apos;scrollbars=yes,width=550,height=520&apos;);return true' style='border:1px solid #ccc;padding:3px;text-align:center;' target='popupwindow'><p>Enter your email address:</p><p><input name='email' style='width:140px' type='text'/></p><input name='uri' type='hidden' value='SpiceUpYourBlog'/><input name='loc' type='hidden' value='en_US'/><input type='submit' value='Subscribe'/><p>Delivered by <a href='http://feedburner.google.com' target='_blank'>FeedBurner</a></p></form></p>
</div>
<div id='backgroundPopup'/>

Important - You need to change our feedburner username with yours.The username for your feed can be found at the end of your feed URL.For example the our feedburner URL ishttp://feeds.feedburner.com/prohackersden/ , with SpiceUpYourBlog being the username.


Drop your comments  below. 

linkwithin

Related Posts Plugin for WordPress, Blogger...

social networks


Twitter Delicious Facebook Digg Stumbleupon Favorites More

 
Design by Free WordPress Themes | Bloggerized by Lasantha - Premium Blogger Themes | Colgate Coupons